CWDM stands for coarse wavelength division multiplexing, and it was made for fiber optic network to increase the capacity of it without having to add extra fiber. The most important component in the CWDM system is the CWDM Mux/Demux (multiplexer/demultiplexer).
Normally, it helps in transmitting multiple wavelengths and increases the fiber capacity if the cable to an extent of 18 different signals over one fiber. The following information is going to help you in installing your CWDM Mux/Demux system. Until and unless you are someone who has an experience in doing this, it’ll be of a great help if you choose to follow the given below information.
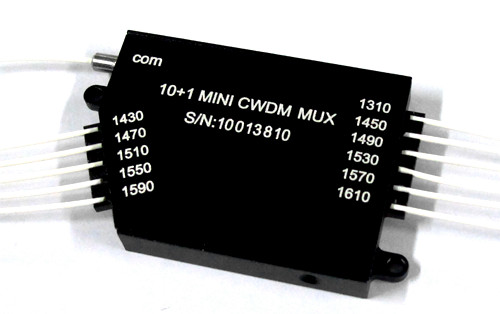
Introduction to CWDM MUX/DEMUX Module
This device is extremely reliable and simple to use. It comes in a variety of combinations and wavelengths that mostly ranges from 1270nm to 1610nm (20nm spacing). This module can fit into different modules depending upon the design we pick for the channels, after comprehending its application. One fiber can withstand four different wavelengths normally with a 4 channel Mux/Demux module. This gives the fiber the liberty to release four different kinds of data simultaneously.
CWDM Mux/Demux can be used on a normal day as a multiplexer or demultiplexer at each end of the fiber cable span. Although, it still has to be installed in pairs.
How to Add CWDM MUX/DEMUX System to Your Network?
Install the Rack-Mount Chassis: take a standard 19-inch cabinet or a rack and install the CWDM rack-mount chassis over it. Next, whenever you choose to glue the chassis to the rack, make sure that you are installing the rack-mount chassis on the similar rack or maybe next to it. Hence further, it is easier for you to connect the cables between the CWDM Mux/Demux modules and the CWDM SFP transceivers in your system.
Install the CWDM Mux/Demux Modules: first thing that you should do is to manage the alignment of the chassis shelf to insert the module and then next very slowly push the module into the cavity of the shelf. Also, don’t forget to screw the nails harder.
Connect the CWDM Mux/Demux to Switch: once we have inserted the CWDM SFP transceiver in the switch, the next step is to pick the single mode patch cable and connect the transceiver immediately. Also, make sure that the CWDM Mux/Demux pairs are carrying the transceivers at the same wavelength. If the wavelength is different it is going to automatically show a different color.
Connect the CWDM MUX/DEMUX Pairs: finally, when you have seen the CWDM multiplexer at one end of the network, make sure to use the demultiplexer at the other end of the network. And finally, last but not the least, complete CWDM Mux/Demux system by connecting it to the Mux/Demux pairs and install them successfully.